What
is a microchip?
A microchip is the size of a grain of rice, encased in biocompatible
glass.

Each chip is randomly pre-programmed with its own individual number.
The chip is totally passive. Not until the low frequency radio wave from the scanner is passed over the chip does it become active. The number then appears on the LCD of the scanner.
There are various types of microchips in the market place, most of which can be read by our FDX A/FDX B ISO reader.
The scanner
Scanners come in various different makes and models. They all
operate in slightly different ways, yet all have the same basic function:
that of reading and displaying the microchip number.
1. Using the scanner
This is achieved by simply switching the scanner on by pressing
the button once or twice, depending on the scanner, to begin searching.
The best way to scan is to hold the scanner horizontally with it lightly brushing the animal's coat. Begin scanning SLOWLY over the animal's implant site, using small circular motions from left to right and around the area.
· Please note - it is very important to continue scanning the
animal all over the body if the chip is not detected in the normal site.
2. Microchipping procedure
Before attempting to microchip any animal, you must always scan
it thoroughly all over, to ensure that it has not been previously microchipped.
If a chip is already present do not attempt to re-chip the animal.
Inform the owner of this fact and investigate previous ownerships, contacting
the database as need be, at Toll Free: 1-877-738-4384.
If you have scanned the animal all over its body and have not detected
a microchip, it is now safe to continue.
Microchipping, particularly dogs and cats, is a simple straightforward subcutaneous injection. Be sure to implant the microchip in the cavity between the scapulea (shoulder blades).
3. Implant procedure
- First verify the sterility of the chip packet. The sterile
packet contains the needle, microchip and separator within the needle.
- Scan the microchip before opening the packet and confirm that the number matches the bar code.
- Remove the needle from the packet, and holding the gun in the hand you will use to implant, attach the needle to the gun. Ensure that the bevel in the needle is facing you
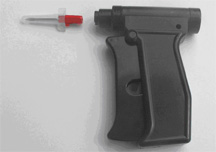 |
The M4S Implant gun and needle
- For dogs and cats, the chip should sit between the scapulae (shoulder
blades) after implantation, and NOT in the scruff (for other animals please
see relevant sheet).
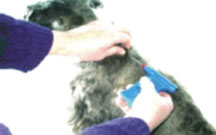 |
***Photo showing correct implant site for dogs
Restrain the animal, then proceed by taking hold of the skin
slightly behind the implant site and swab this area with sterilizing solution
(i.e.: surgical spirit). Please note that it is important not to pick
up too much loose skin, to ensure that the chip ends up in the correct
place. A tip is to remember to take less skin, rather than more, and to
chip deeper rather than shallower.
· The entry point of the needle is just beneath your thumb and forefinger, at an angle of about 30 degrees. It is important that you chip towards the animal's head, and only expel the chip when the needle is between the scapulae.
· Using gentle pressure with the implant gun, insert the needle into the animal. The shape of the needle makes a small cut in the skin, allowing the needle to pass through.
· Once the needle is completely in the animal (up to the plastic hilt), squeeze the trigger on the gun. This causes the plunger to push the spacer in the needle, thus implanting the chip into the animal.
· When extracting the needle from the animal, it can create suction. This can sometimes lead to the chip working its way back out. To prevent this, ensure that you pinch the skin around the needle when you withdraw it. When the needle has been removed, apply finger pressure on the entry site for a few seconds.